
AWS AMI: AlmaLinux OS 8 + VirtualMin GPL Control Panel + Support
AlmaLinux 8: Enterprise grade Linux with End Of Life support until at least 2029
AlmaLinux OS is a Linux distribution that was created by CloudLinux to provide a community-supported, production-grade enterprise operating system that is binary-compatible with Red Hat Enterprise Linux (RHEL). AlmaLinux continues the good work from CentOS 8.
CentOS was originally derived from Red Hat Enterprise Linux and has maintained a similar level of stability since 2004. CentOS used to be one of the most popular Linux distribution used in data centers globally. Especially because of its long term support (LTS) cycle of at least 10 years.
However, CentOS's life cycle was shortened from 2029 to December 2021 after Red Hat was acquired by IBM. In response, CloudLinux created AlmaLinux to provide a community-supported, production-grade enterprise Linux distribution that is binary-compatible with RHEL and has a life cycle of at least 10 years. AlmaLinux was released on April 27, 2021. End of life support for AlmaLinux is currently scheduled for April 2029, sponsored by CloudLinux and released under the GNU General Public License (GPL).
AlmaLinux OS is used for many applications. Some popular ones are listed below.
- Web hosting without or with CMS such as WordPress and Drupal.
- Application hosting with server-side languages such as PHP, Python, NodeJS, Ruby, and more.
- API / Webservices hosting.
- Email hosting using Postfix, Dovecot, and others.
- Database hosting such as MariaDB, PostgreSQL and MongoDB.
- File and print services.
Github: https://github.com/AlmaLinux/
Open source software license: https://almalinux.org/p/the-almalinux-os-licensing-policy/
Virtualmin GPL: Web-based Virtual Hosting Control Panel
Virtualmin is a powerful and flexible web hosting control panel for Linux systems. It is designed to make web hosting easier by providing a simple and easy-to-use interface to manage websites, email accounts, databases, and more. Virtualmin is available in both free open-source (GPL) and paid versions.
By using Virtualmin GPL with AlmaLinux, you can manage multiple websites, domains, email accounts, databases, SSL certificates, and much more from a single Web interface.
VirtualMin GPL also includes Webmin. This is a powerful and feature-rich Web-based admin interface for Unix/Linux systems that allows you to manage your server without having to use the command line.
Virtualmin is a trademark of Virtualmin, inc. Virtualmin is not developed by us. All support as mentioned on this page is provided by us without any endorsement of Virtualmin, inc. For support by Virtualmin, inc, please look at https://www.virtualmin.com/documentation/system/support/ and https://forum.virtualmin.com/.
Github: https://github.com/virtualmin/virtualmin-gpl
Open source license: https://github.com/virtualmin/virtualmin-gpl/blob/master/LICENSE
What kind of support is included with this AWS Marketplace AMI?
This Amazon AWS AMI includes support that will help you set up and initially use AlmaLinux OS 8 and Virtualmin GPL Control Panel. This support is provided by us and not by Amazon AWS or Virtualmin, inc itself and includes:
- Getting started with AlmaLinux OS 8 and Virtualmin GPL.
- Answering general questions about using AlmaLinux OS and Virtualmin GPL Control Panel.
- Configuring AlmaLinux OS 8 for optimal use with Virtualmin GPL.
- The basic configuration of Virtualmin GPL Control Panel.
- Updating the general installation of AlmaLinux OS 8 and Virtualmin GPL.
The support does not include:
- Custom or specific configurations beyond the initial deployment of AlmaLinux OS 8 and Virtualmin GPL.
- Troubleshooting of your application or website.
- Support for issues that are specific to your application or website.
Getting started with this AMI for AlmaLinux OS 8 and Virtualmin GPL
The initial setup process has 7 steps:
- Setup the appropriate security groups for AlmaLinux OS 8 and Virtualmin GPL
- Launch the AMI with a new or your existing key pair
- Convert your key pair from PEM to PPT format
- Use WinSCP and Putty to access the EC2 Instance
- Set a root password
- Log into Virtualmin
- Make your first Virtual Server (= domain with website or web application)
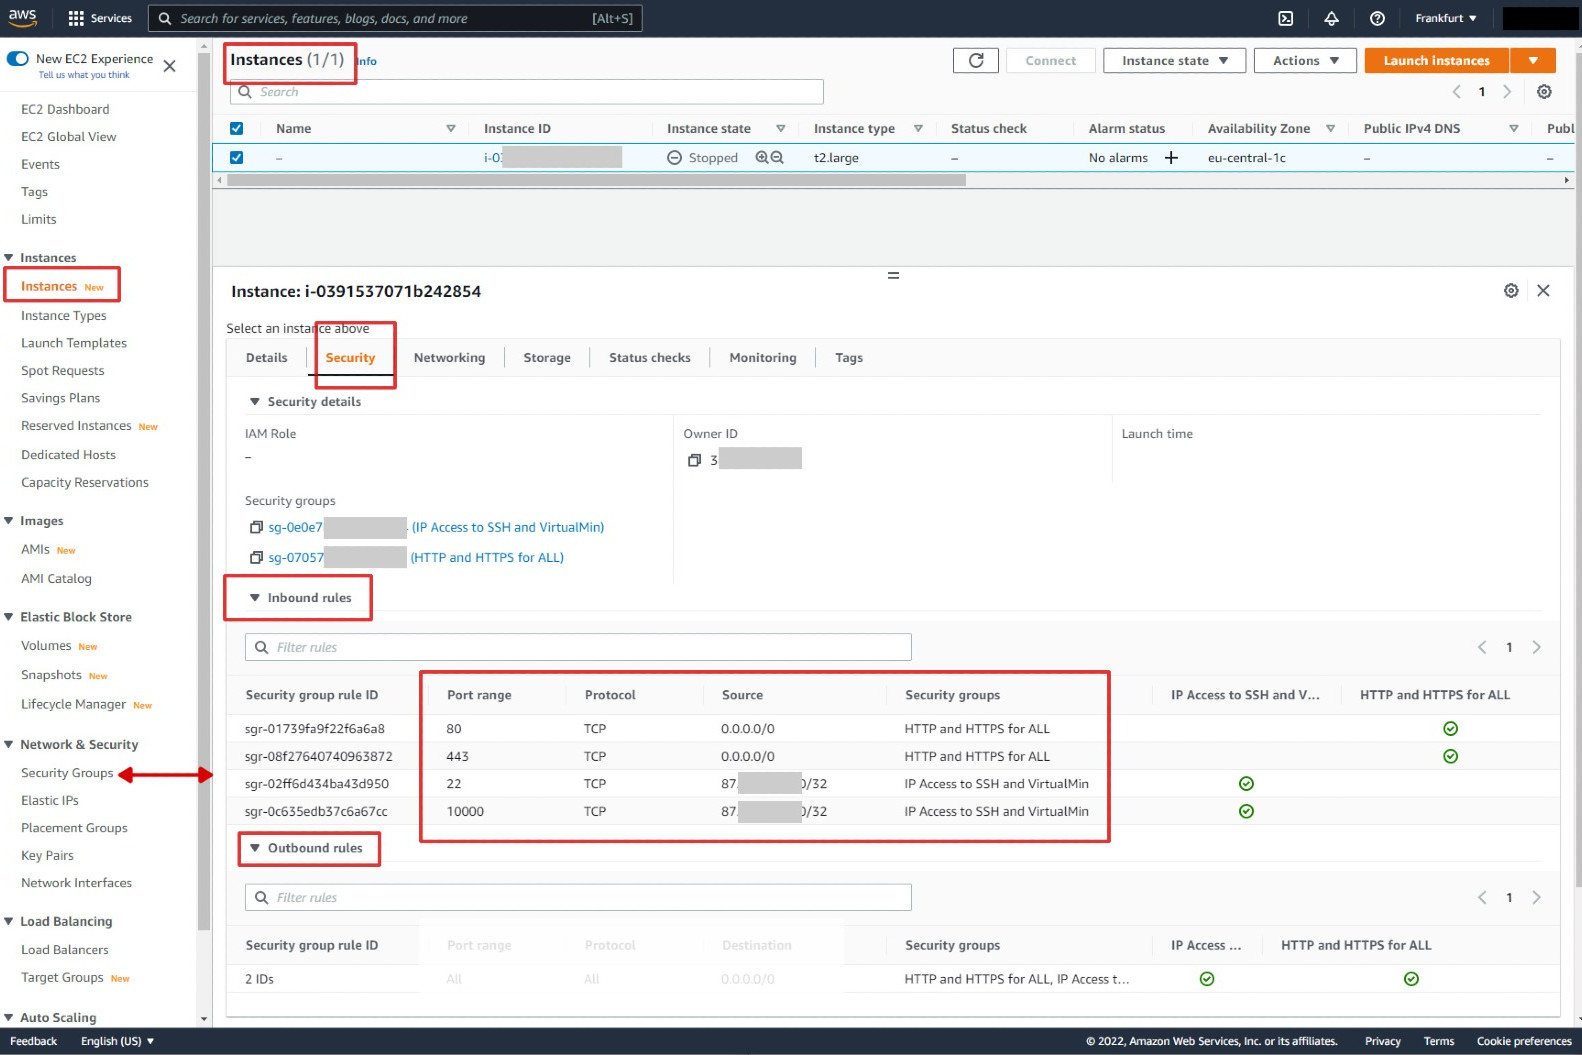
1 - Setup the appropriate security groups for AlmaLinux OS 8 and Virtualmin GPL
The first step is to go to AWS EC2 Security groups and to ensure that the following ports are open for ALL inbound traffic:
| Use | Port (inbound) | Protocol | From IP |
| HTTP | 80 | TCP | ALL |
| HTTPS | 443 | TCP | ALL |
The following ports should only be accessible to inbound traffic from IP addresses you trust:
| Use | Port (inbound) | Protocol | From IP |
| SSH | 22 | TCP | Only trusted |
| Virtualmin | 10000 | TCP | Only trusted |
As a result, your security groups should look something like this:
2 - Launch the AMI with a new of existing key pairs
Next, launch this AMI from AWS Marketplace in the usual way.
Select the instance type to match your usage and demands. Here are some examples:
| Instance type | Typical use |
| t3.medium | Testing, trying out Virtualmin |
| t3.large | Up to 25 websites including CMS and limited server side scripting for Web applications and light database use |
| t3.xlarge | Up to 50 websites including CMS and modest server side scripting for Web applications and modest database use |
| t3.2xlarge | Up to 100 websites including CMS and extensive server side scripting for Web applications and high database use |
The default storage volume for this AMI is 100 GB but you may change this setting. You can go as high as you want. In most situations, the default volume size will be adequate to host up to average size 25 websites, including a CMS (such as Wordpress) and a number of web applications.
In the step where you set the security groups, make sure that you have selected security groups that allow access as specified in the previous section.
Finally, launch the EC2 instance using your existing key pair or create a new RSA key pair. Make sure that you have a download of this keypair, which will be a PEM-format file.
3 - Convert your key pair from PEM to PPK format
The RSA key pair that you can download when creating an EC2 instance will be in PEM format. PEM stands for Privacy Enhanced Mail and is an internet standard used for encrypting keys and certificates.
WinSCP and Putty are free, open-source applications for Windows that enable you to access your Alma Linux instance from your PC straightforwardly and easily.
However, before you can use these, you need to convert your PEM key file into a PPK V2 key file. PPK stands for PuTTY Private Key.
The conversion process is simple and can be done using the free and open-source PuTTYgen application. You can download this application from this URL:
After installing PuTTYgen, please follow the instructions below:
- open PuTTYgen
- File -> load private key -> set the default file type from *.ppk to All files *.*
- Find and open your PEM key file
- IMPORTANT - SET THE PRIVATE KEY FILE PARAMETER TO PPK FILE VERSION 2
- To do this: Key -> Parameter for saving key files -> change radio button PPK file version from the default value 3 to 2 and click on OK
- Back in the main window of PuTTYgen, click on Save private key
- It is advisable to set a password in your PPK file by entering a Key passphrase and re-entering this value in Confirm passphrase. Each time your PPK file is used to log in, the secret passphrase must also be entered.
Next, you can use the generated PPK file to log in to your Alma Linux instance using WinSCP.
4 - Use WinSCP and Putty to access the EC2 Instance
WinSCP is an award-winning open-source graphical file manager client that you can use to access your AlmaLinux instance from your windows computer. You can download this application for free from the following URL:
On your Windows computer, download and install the WinSCP package. We recommend selecting Explorer mode during installation for this reason. You may simply drag and drop files between the AlmaLinux instance and your Windows PC using this mode.
After you have installed WinSCP, you need to download and install Putty as an external application. This will allow you to start Putty from WinSCP.
Install and download Putty
The Putty open source software is a command-line utility that allows you to issue instructions to your AlmaLinux instance from within a console window. Such as setting passwords, installing software, starting and stopping services, and much more.
You can download Putty for free from the following URL:
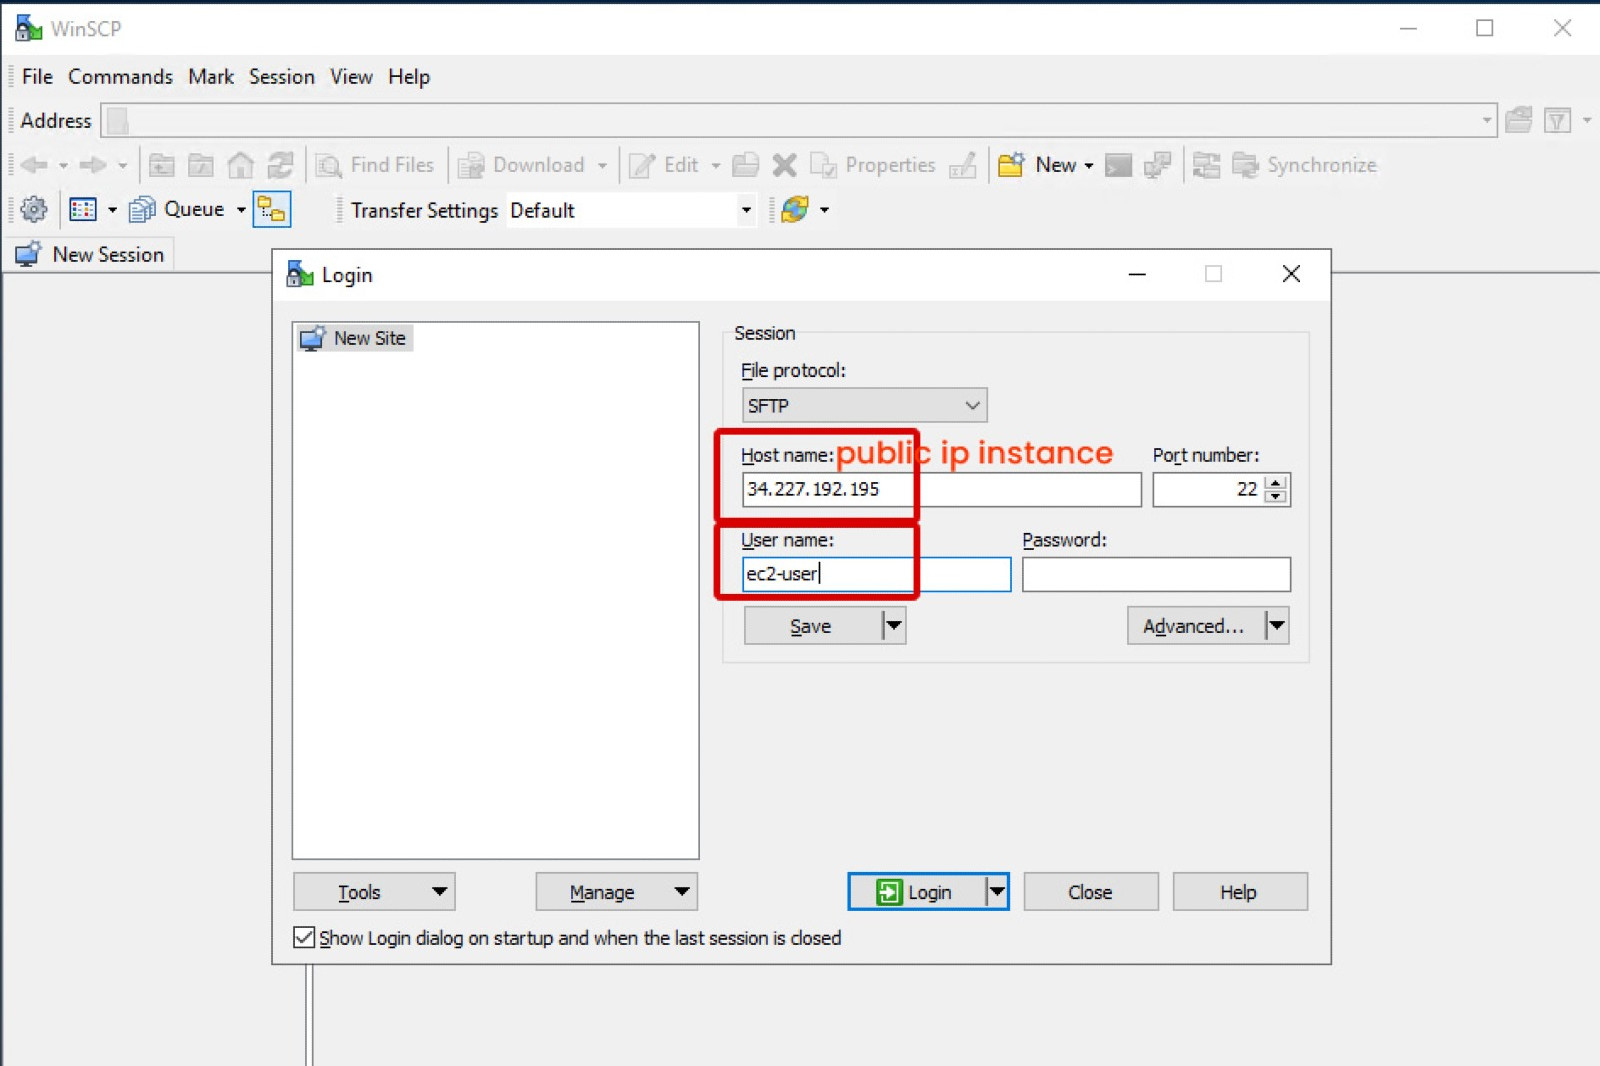
Next, open WinSCP and follow the instructions below. If you have just started your AlmaLinux, instance, it may take a few minutes to connect the first time.
- As Host Name, enter the public IP address of your Alma Linux EC2 instance
- As User Name, enter ec2-user
- Click on the button Advanced to open a window with the Advanced Site settings
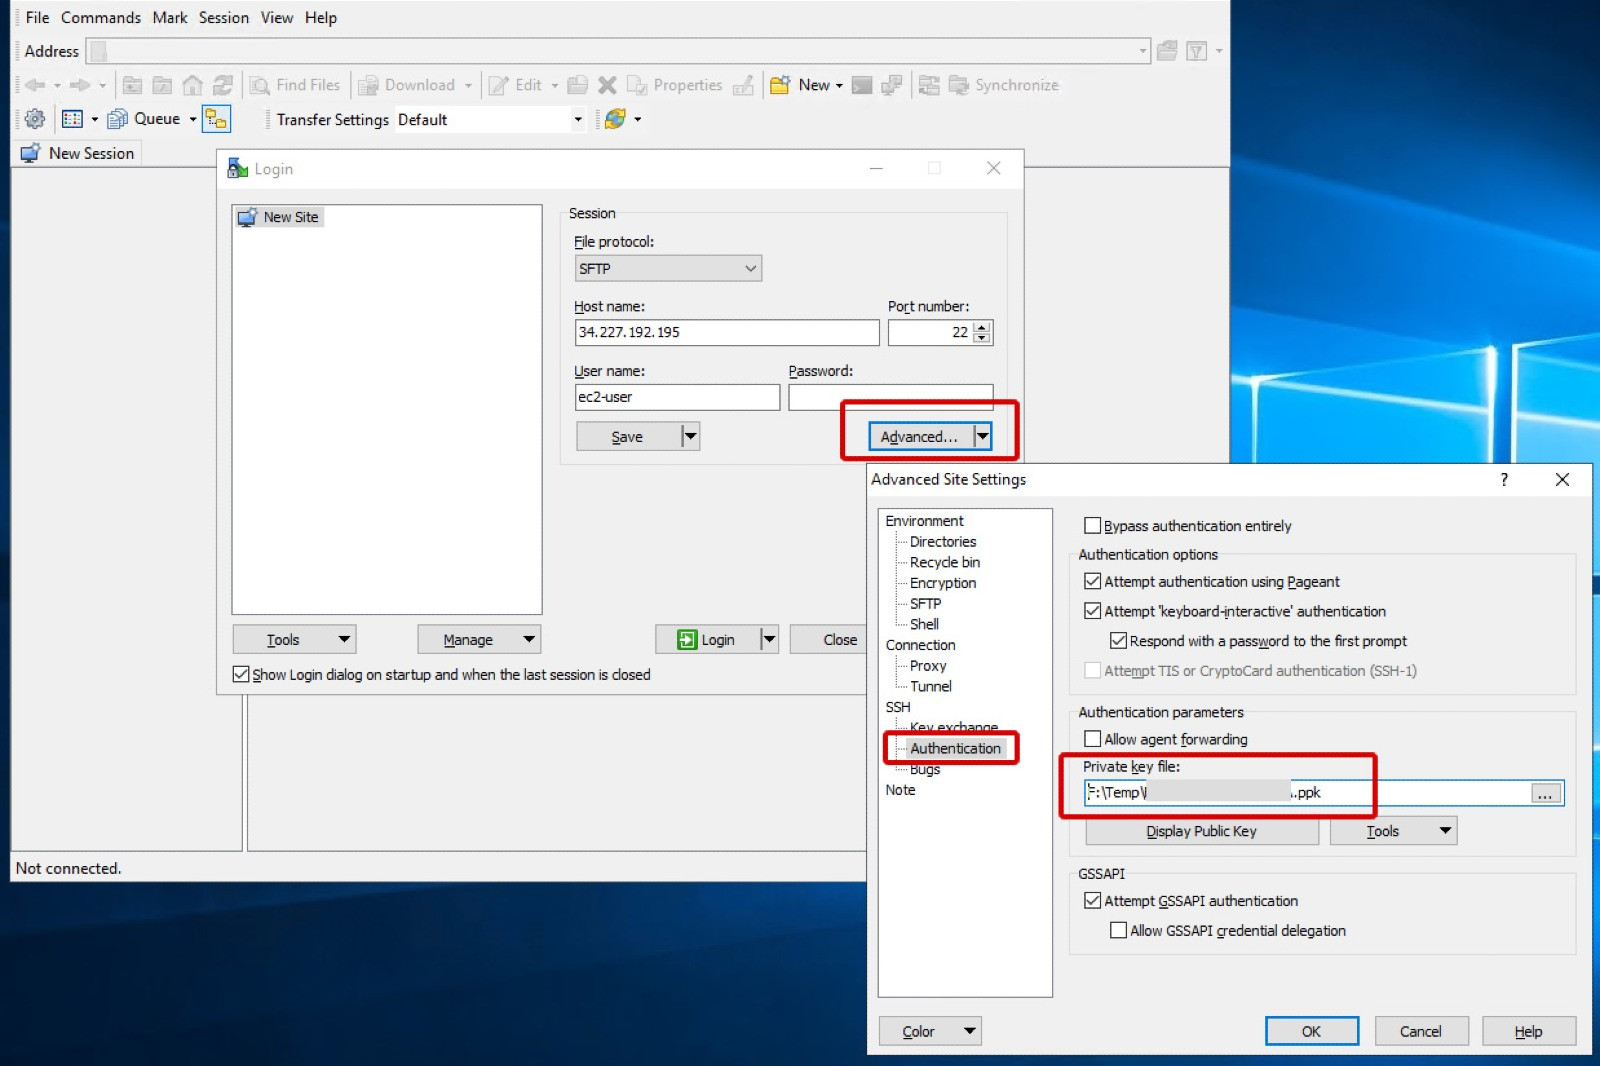
- In the Advanced Site Settings, click on SSH -> Authentication
- Click in the field Private key file and load your PPK key file.
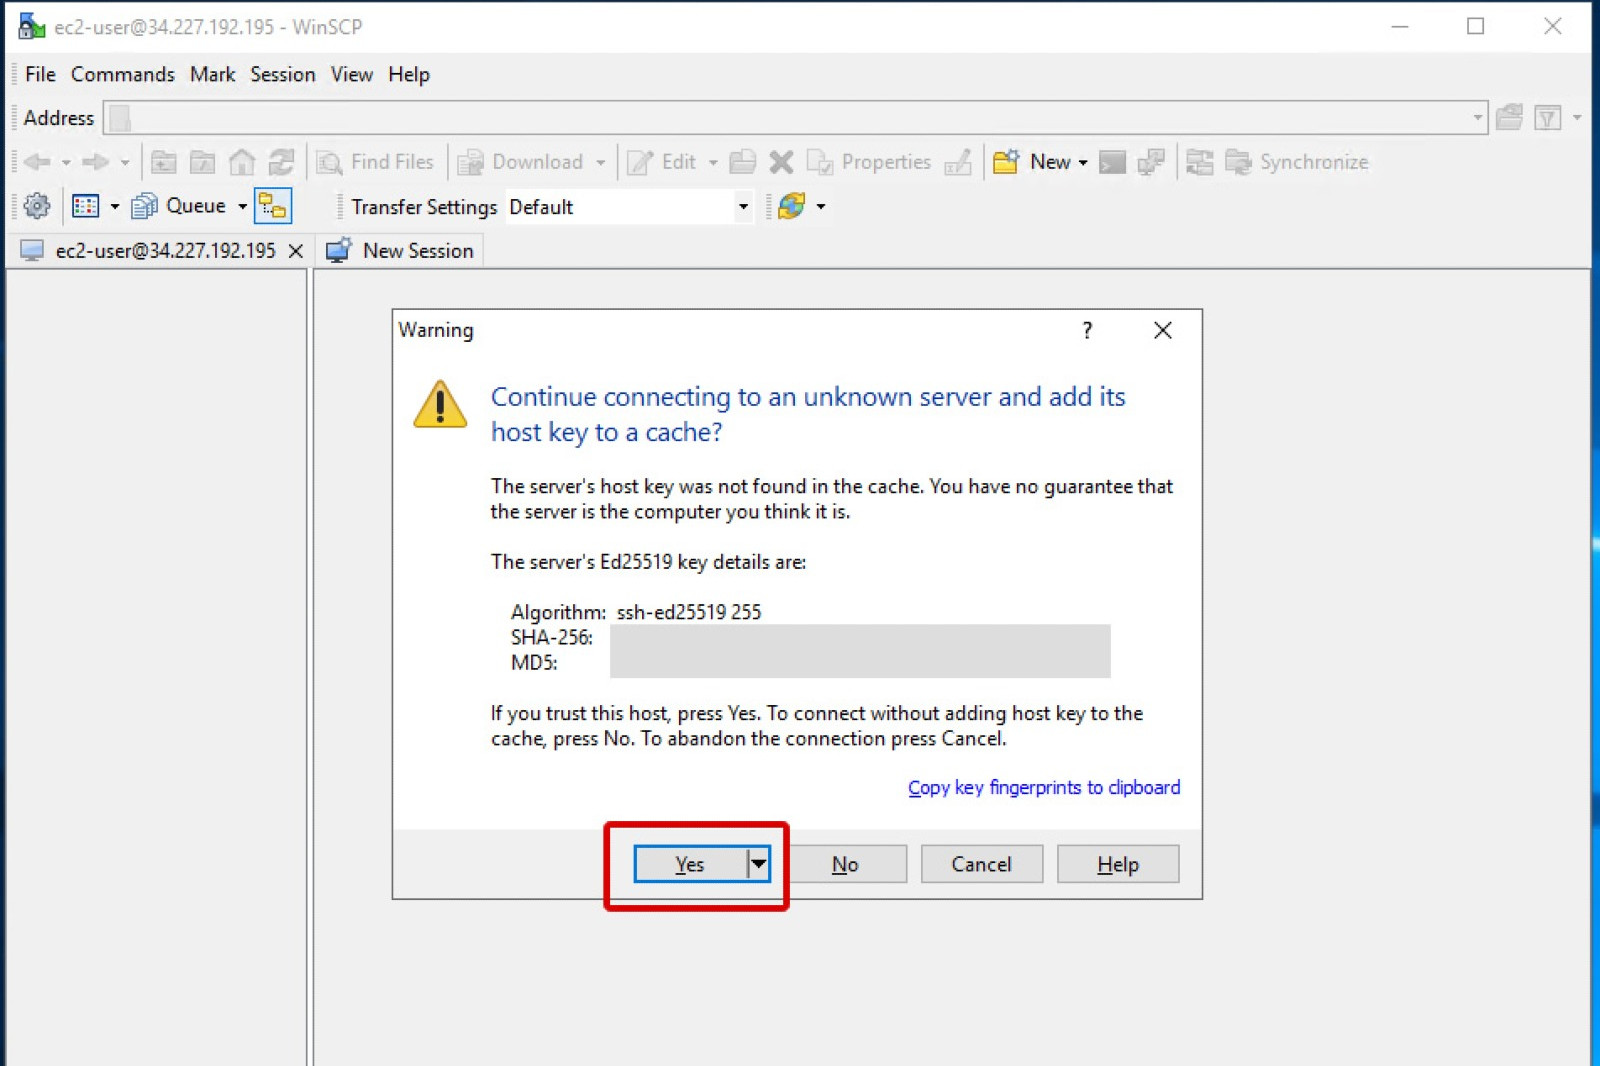
- Click on Save and next on Login
- Answer YES to add host key of your EC2 instance to the WinSCP cache.
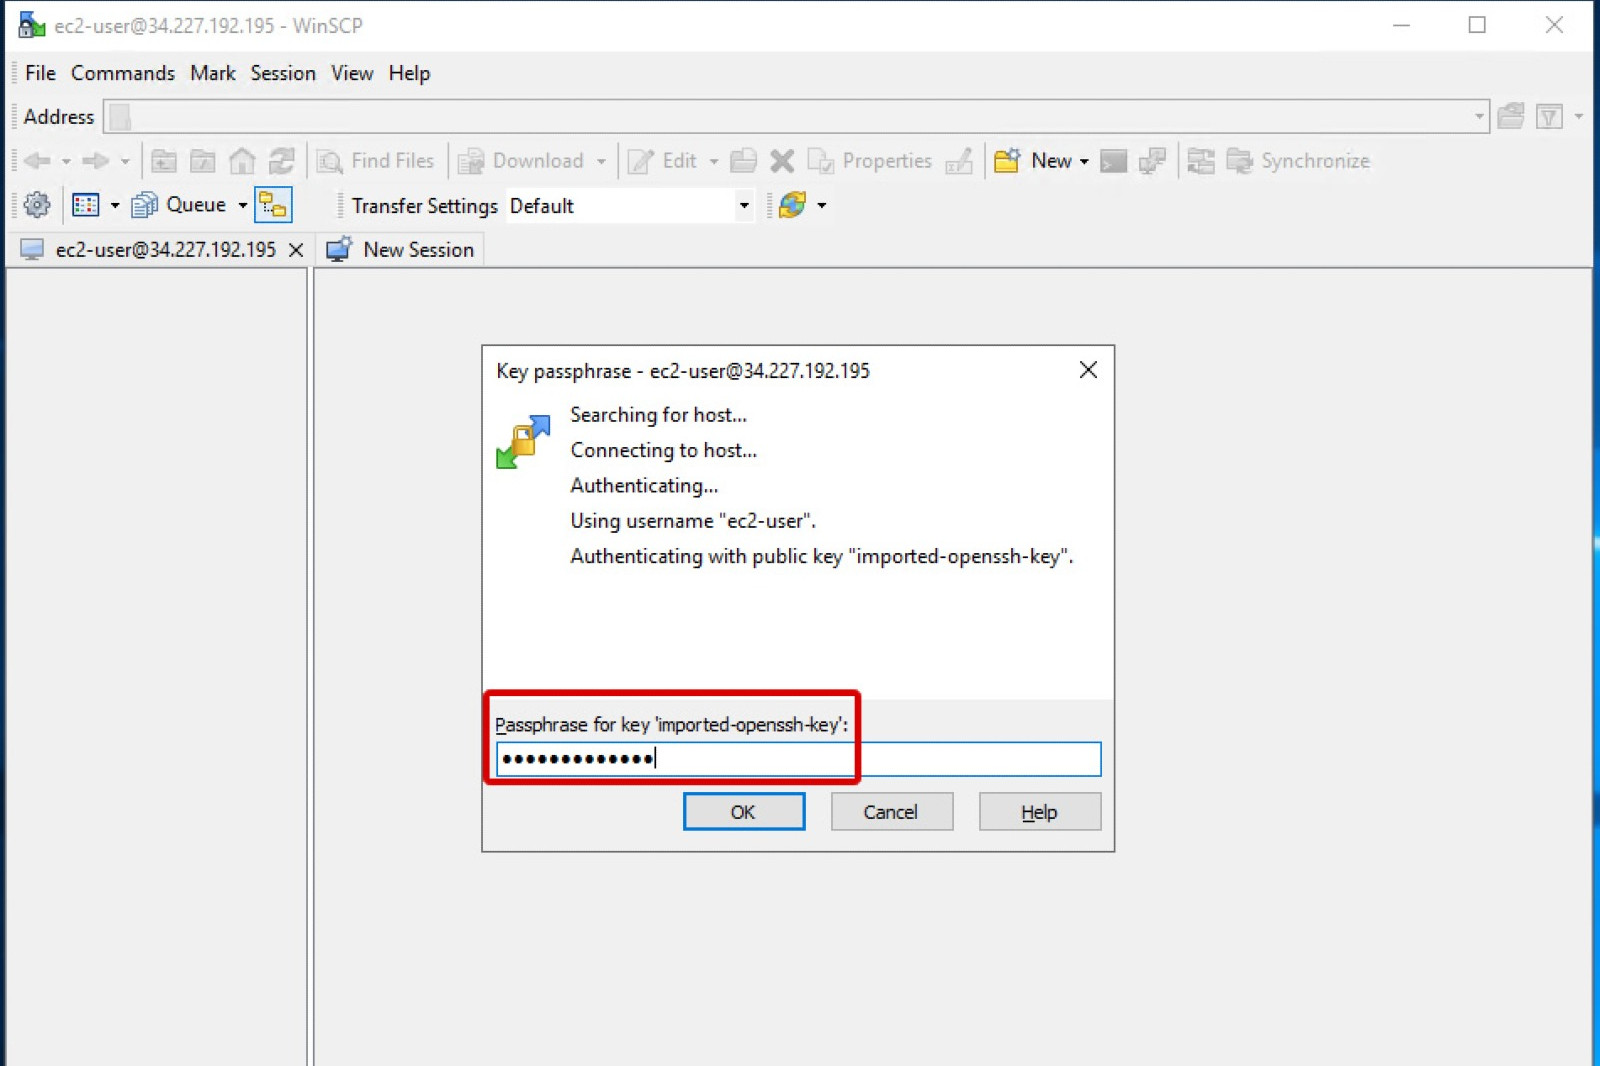
- Enter the passphrase password that you set when creating the PPK key file from the AWS EC2 PEM key file.
- Now you should be successfully logged in to your Alma Linux instance.
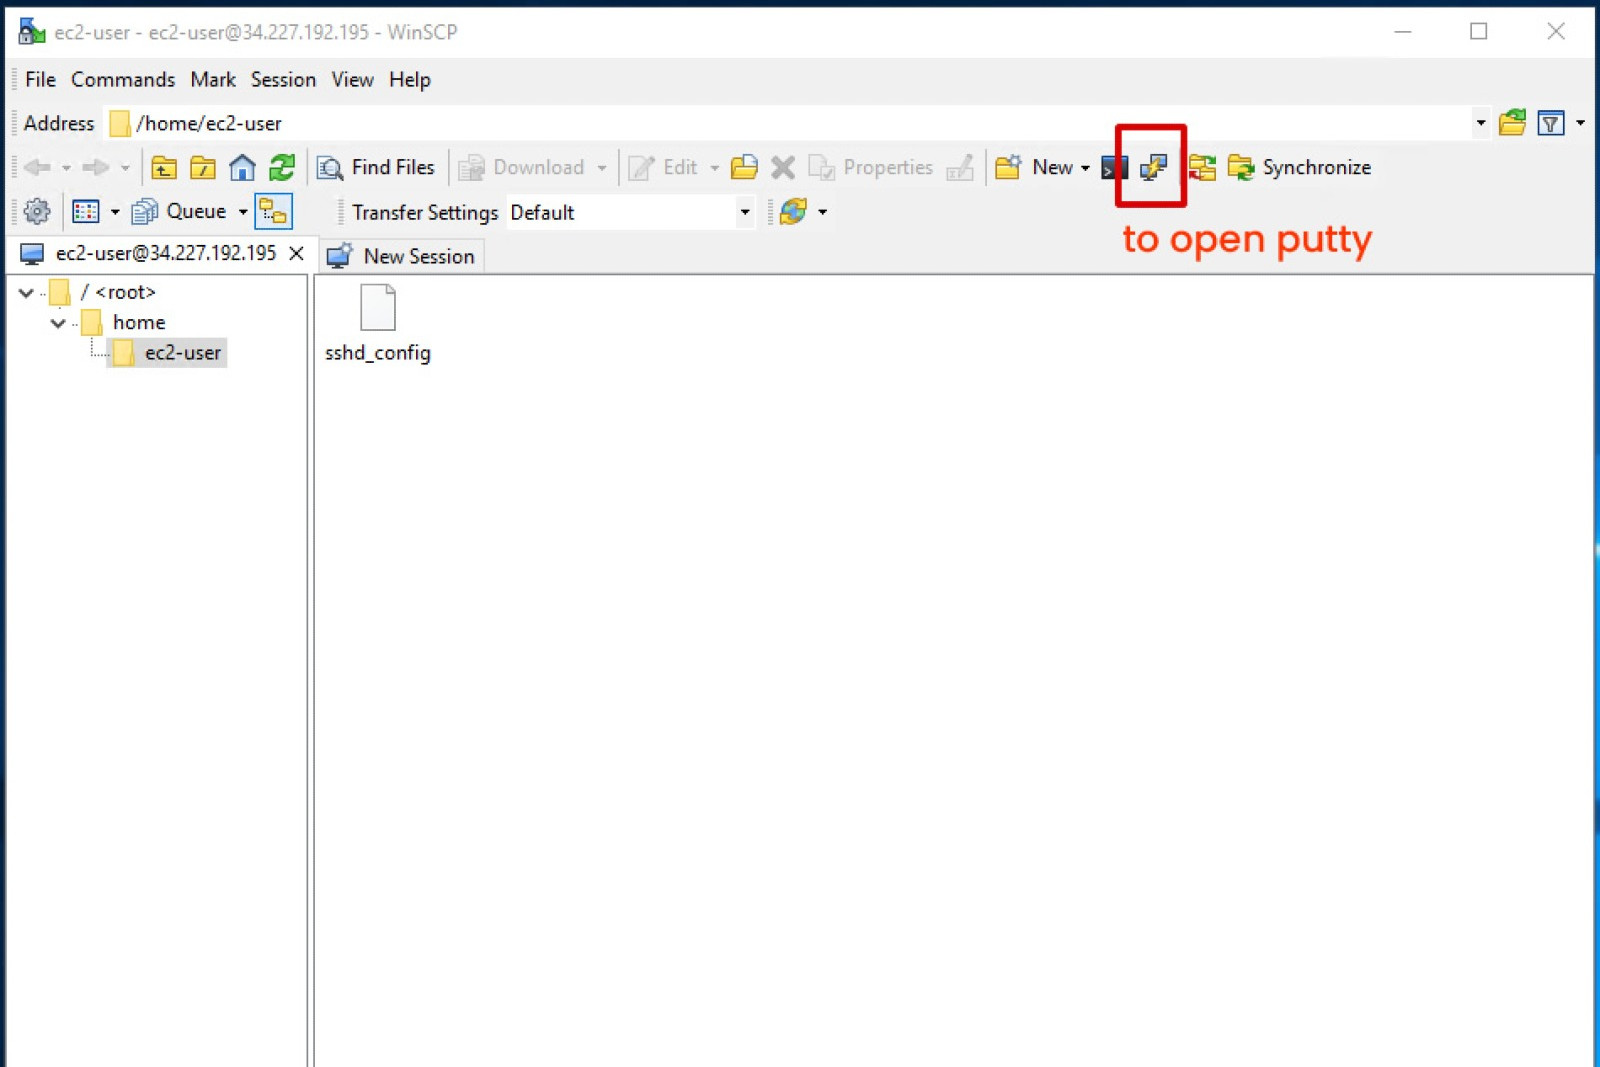
- Open Putty by clicking on the Putty icon in the tools bar in WinSCP
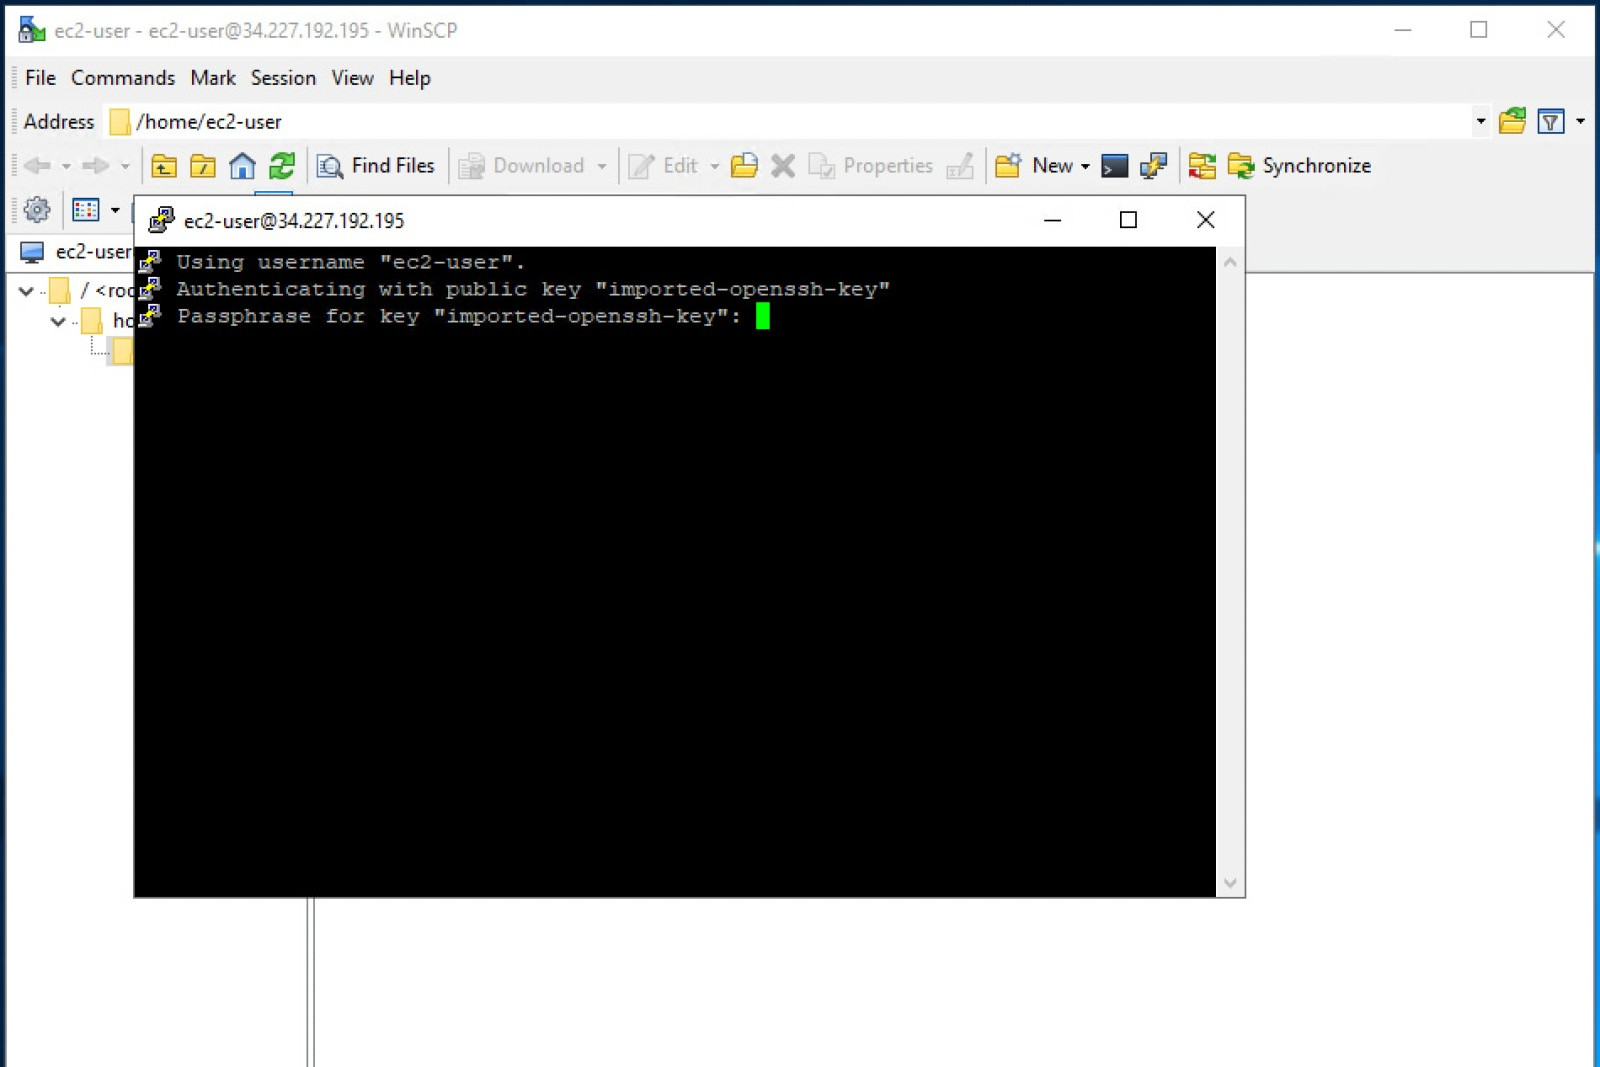
- Enter your passphrase password in the Putty command-line utility
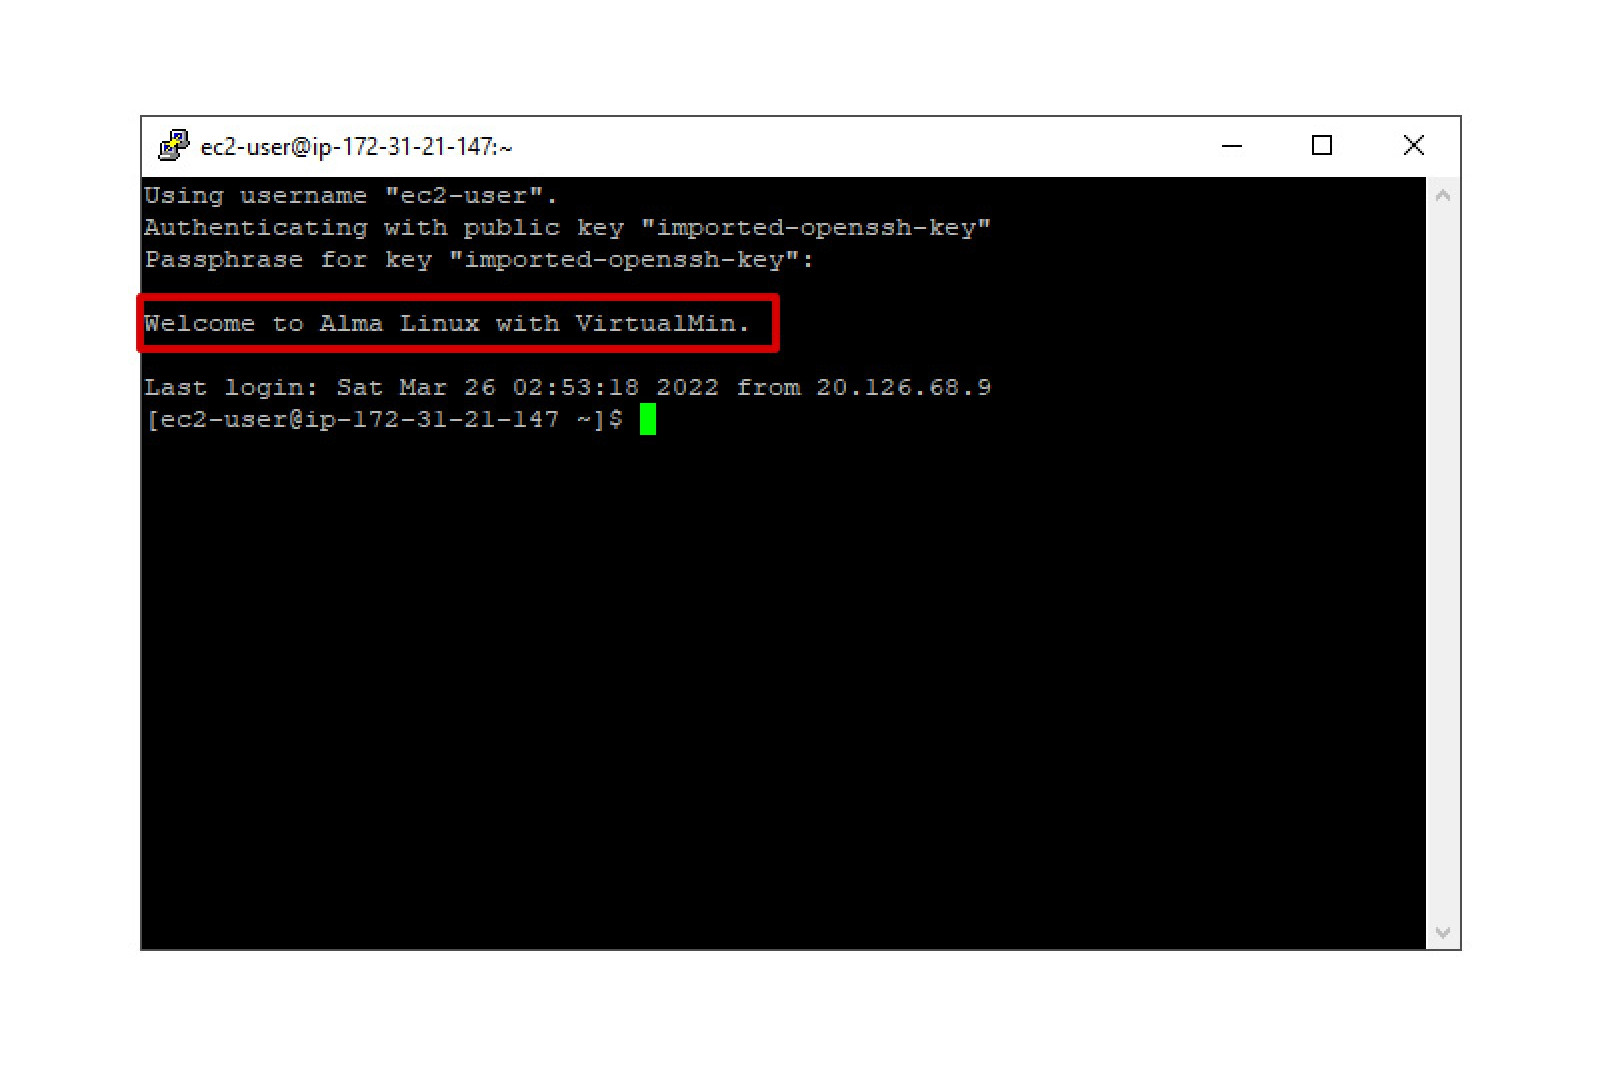
- Now you should also be logged in to the Putty console
Below these steps are shown in screen shots:
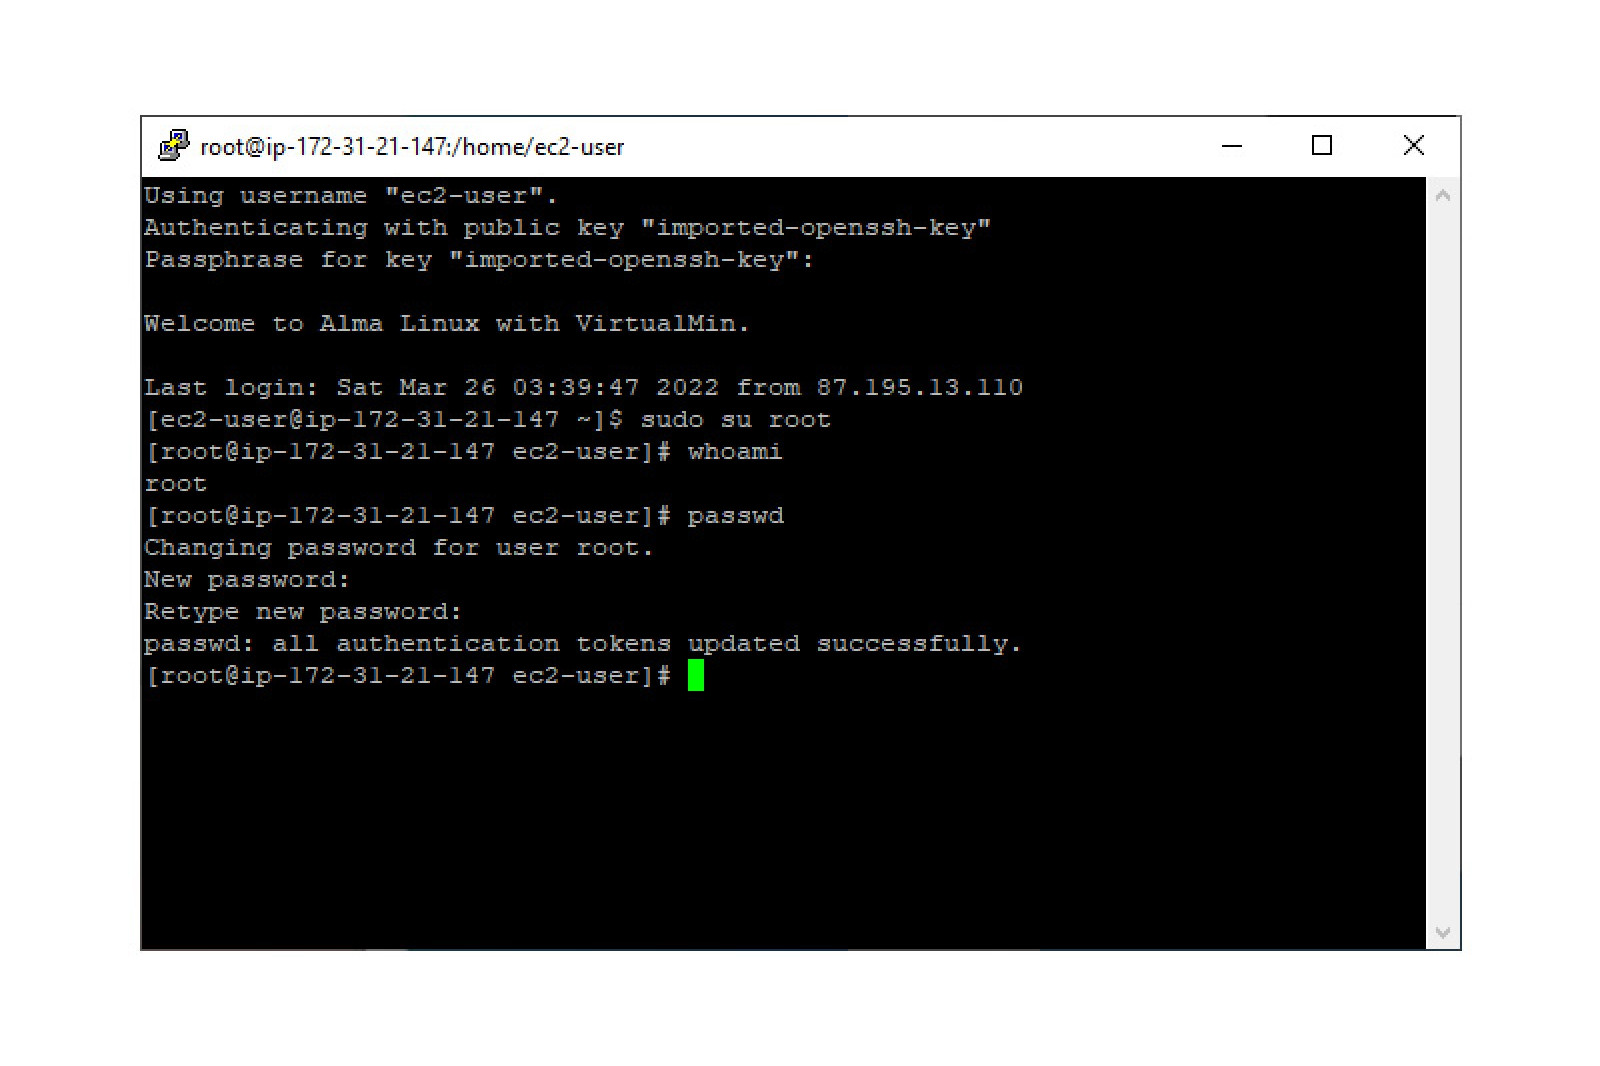
5 - Set a root password for Virtualmin
The next step is to set your root password for your Alma Linux instance so that you can log into Virtualmin. To do so, type the following commands in Putty:
- sudo su root
- whoami -> you should get as answer: root
- passwd
- Now enter your password twice
- you should get a confirmation that your (root) password is set successfully.
Below is a screen show showing these steps.
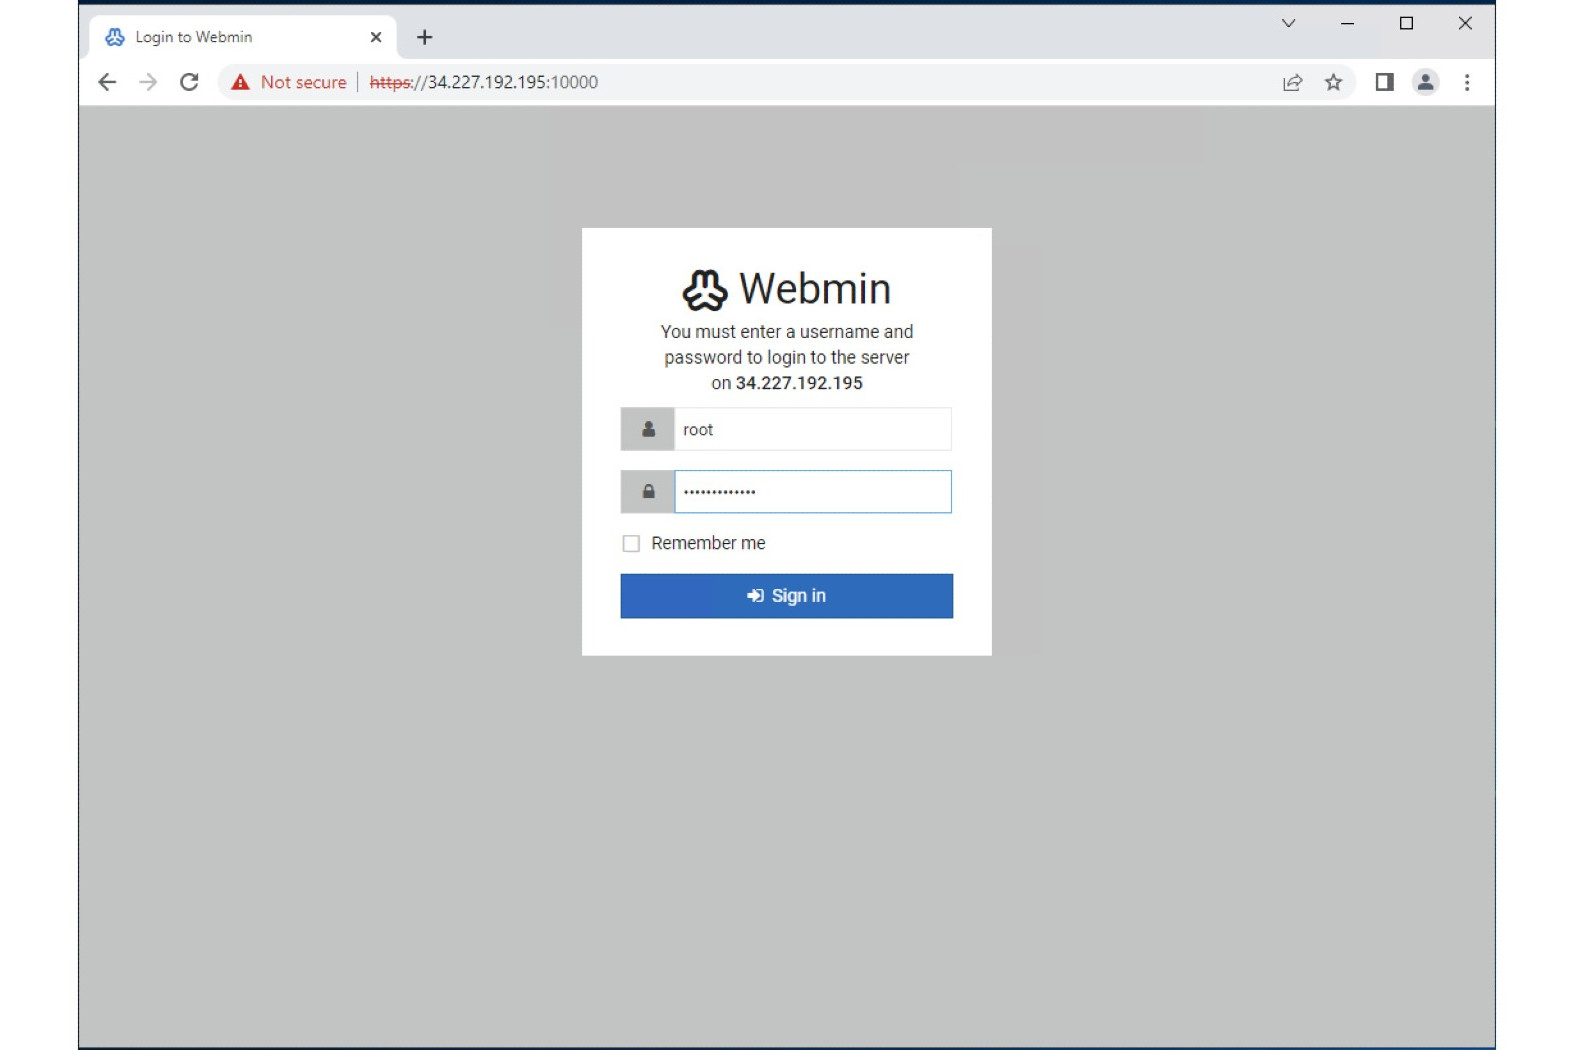
6 - Log into Virtualmin and run a self-test
Now you are ready to log in to Virtualmin.
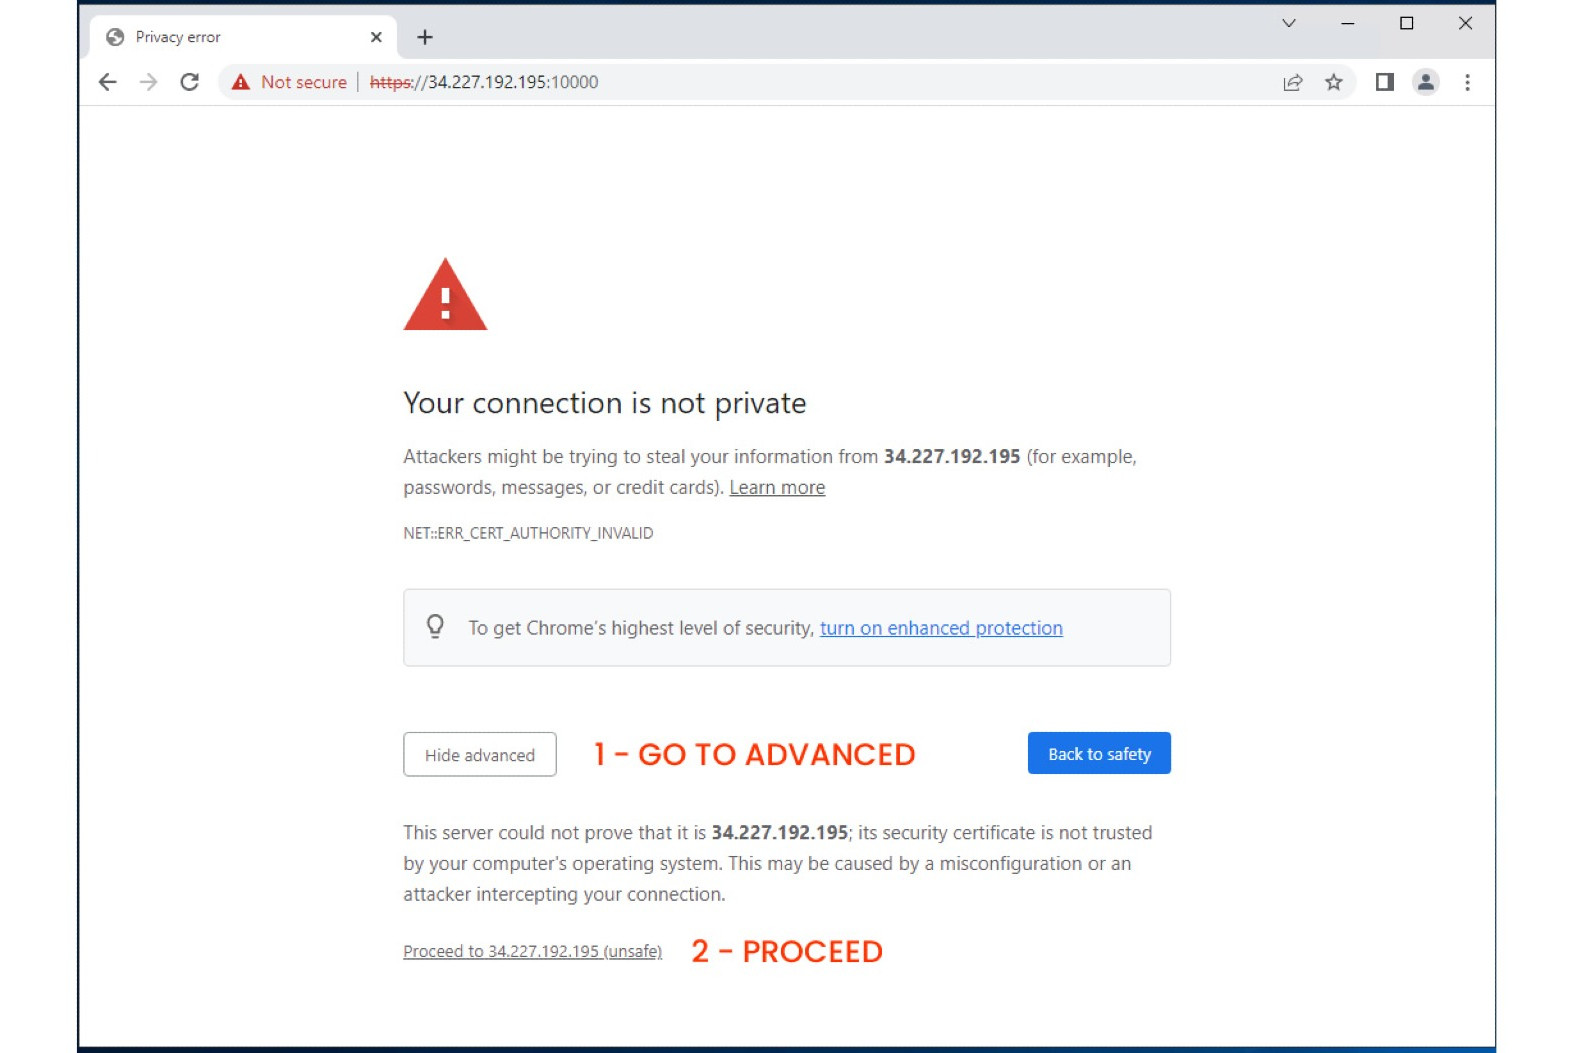
Open in a web browser (i.e. Chrome) the following URL:
https://<public IP of your EC2 instance> :10000
You'll get a notification in your browser now that the connection is potentially not secure or private. This is normal at this point since you're using https, but VirtualMin has no signed SSL certificate yet.
You might add a domain to Virtualmin at a later time and get a free Let's Encrypt SSL certificate through Virtualmin. After this certificate is generated and installed in Virtualmin, the warning will disappear.
For the time being, just disregard this notice and click on the advanced button (in Chrome) and proceed.
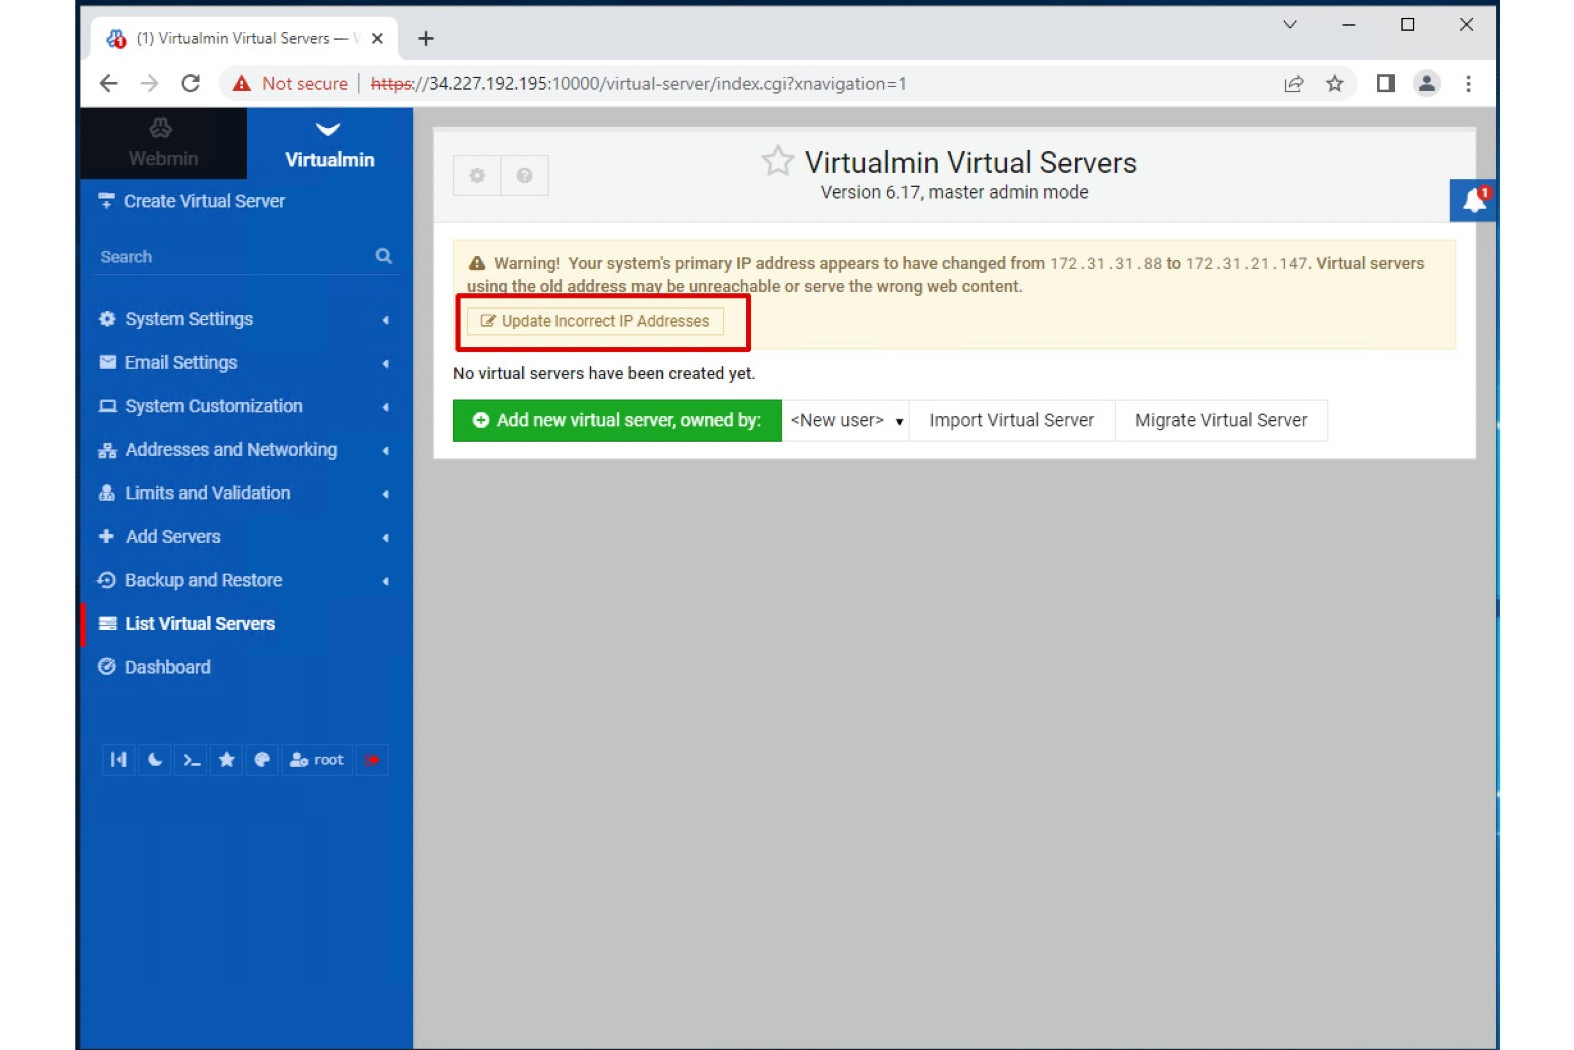
Next, Virtualmin will notify that the IP system's primary IP address appears to have changed. Click on the button to update the incorrect IP address. And on the next screen, click on the Save button.
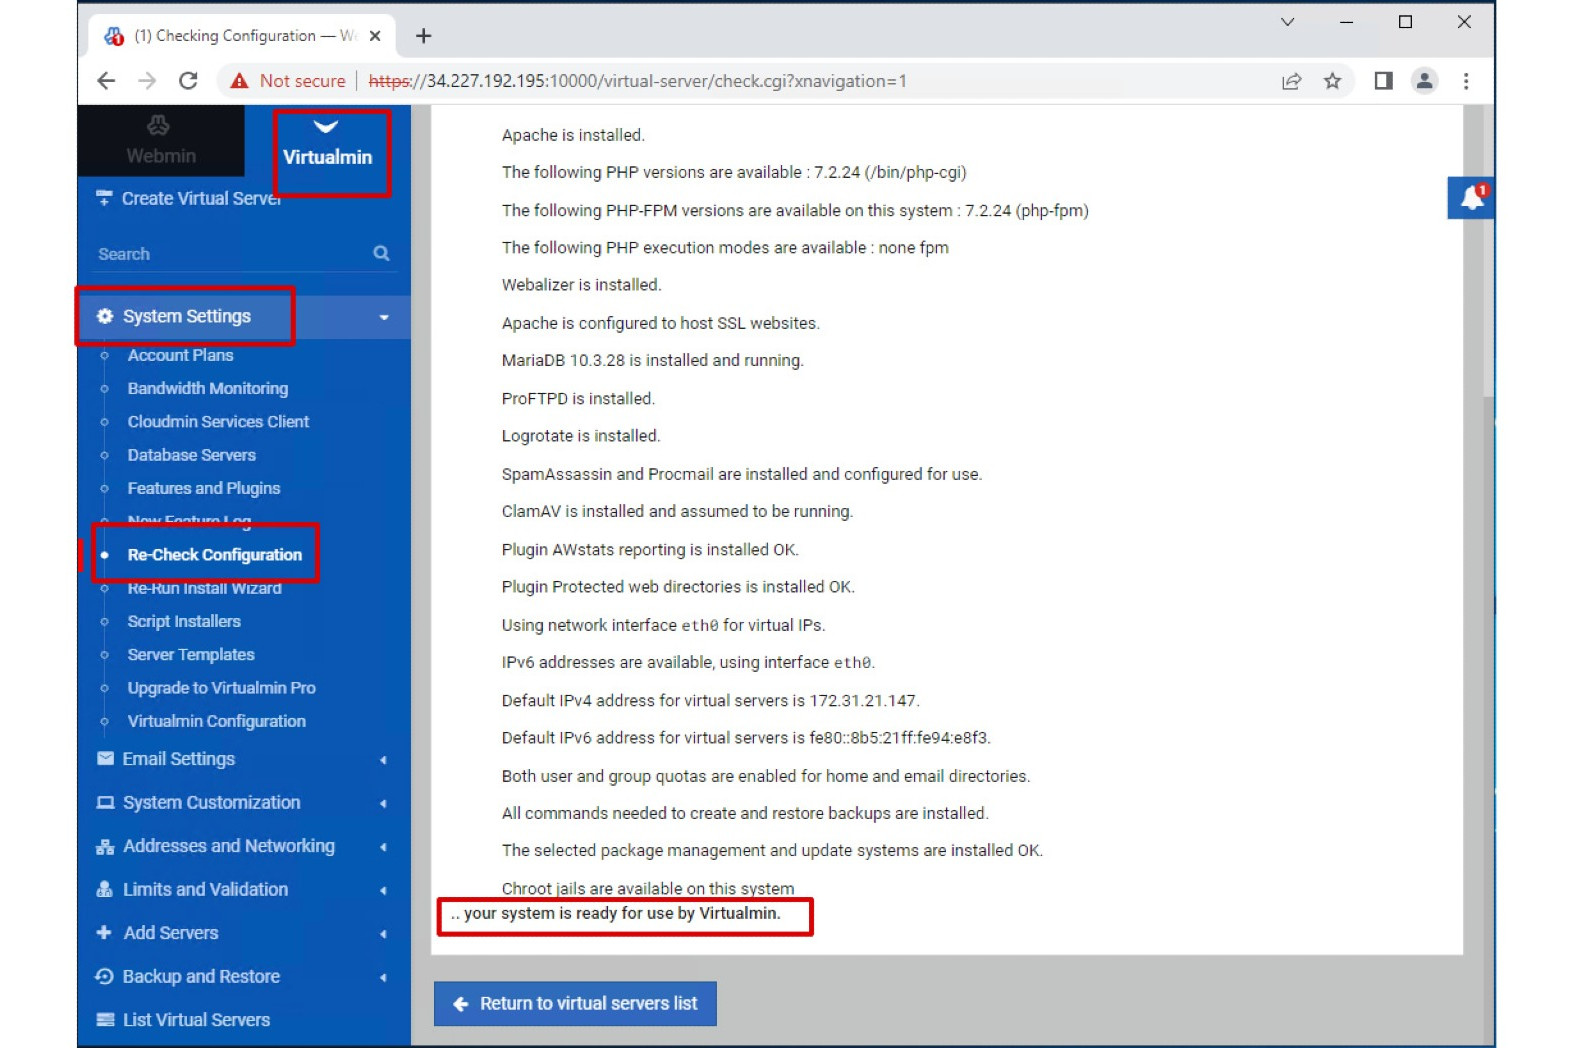
Now Virtualmin is ready for use. You can verify this by clicking on the blue left side pane on System settings and next on Re-Check configuration.
Virtualmin will run a self-test and the outcome of this test should be that your system is ready for use by Virtualmin.
If you are going to use MariaDB, please set your own strong admin password:
-> click on Webmin Tab -> click in the blue panel at the left side on Servers -> my SQL Database server -> in the Global Options, click on the icon Change Administration Password to set your own admin password for the MariaDB SQL server.
These steps are shown in the screen shots below:
7 - Make your first Virtual Server (= domain with website or web application)
Finally, here is a Youtube video demonstrating how easy it is to add a website using Virtualmin.